Saturday, November 29, 2014

Yucca packs and packboards

A question was recently posed about taking a yucca pack off of a packboard with regard to how you re-attach its straps. Short answer, you don't. After looking at both of my yucca packs, checking out packboards, sleuthing every style of bag I could find photos or examples of and finally looking at my copy of the 1948 and 1967 handbooks as well as the 1965 field book, I figured out a few things.

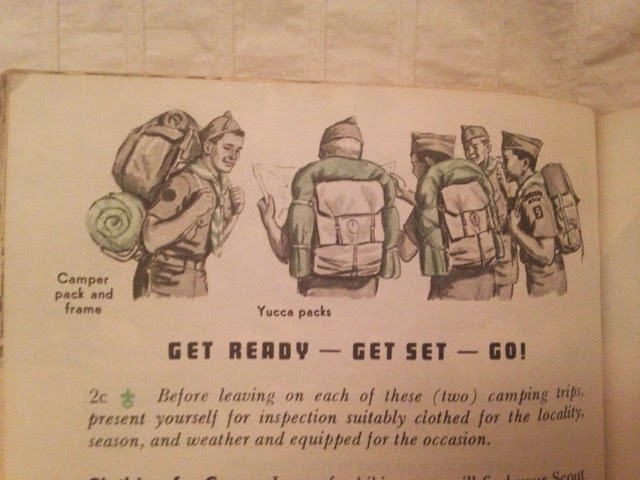
There are about three styles of scout packs that have been in common use as well as a deluxe version of yucca(1329) that is better suited to a packboard or frame, than the most common scout pack, the 574 yucca pack. The official frame was the Cruiser. Two other packs are the ultra basic haversack and the camper or three pocket model. Those four models are all Diamond brand packs and all have permanently attached straps that are stitched and riveted with a reinforced leather patch. If any of those models lack straps, they have been removed or its a different model. 

There are two other less common packs the 1307 D by Diamond and an early one called the Trapper Nelson, both are designed to remain on their frames. The Trapper Nelson is much more rare and looks different from the 1307 which at first glance looks like a yucca. Most 1307 models have a zippered outer pocket and a red Scout seal rather than the black one found on most Diamond brand packs and a handful of others have model numbers you aren't likely to see. As these models are designed to stay on their frames they have no straps or only have straps for attaching to a frame. 

Being canvas, any of the old Diamond brand packs are easily modified and maintained as long as the cloth isnt rotten. If you have a bag needing repairs or something modifed any luggage repair shop should be able to help. 


Thursday, November 13, 2014

Glass knapping

I have a lot of old projects, things that have been set aside for one reason or another but not abandoned. I'm a big believer in know when to push projects and when to let them breath and happen in their own time. My glass(flint) knapping project, and I suppose knapping skills in general, are on that back burner stack.

I did a lot of shaping stone when I was a kid. In scouts, my decade of involvement with Historic Fort Wayne and outdoor adventures in general, flint knapping was something that everyone seemed to be doing. Whether art, hobby, demonstration or any number of other reasons from dressing musket flints to making stone tools, it was just present. When I got to college it was another thing that archaeologists do, though with a more experimental intent. College was also where I started focusing on glass. Partially because it about the best easily obtainable material and partially because it's hard to create false sites or contaminate existing sites with glass. 

I've had a nice piece of glass sitting on my nightstand for months waiting for a time and inspiration. It's kind of a zen thing, shaping a piece of glass with a stone is something everyone should do once or twice. So when I found a scrap of bone last weekend that seemed like "the" haft, I got to work. 

The blade is still rough but shaping nice and I've always wanted to make a knapped knife to carry as a pocket knife just to see how functional it can be. We know countless cultures used stone blades as functional tools at one time and they certainly show up as art now but for tool use seem to have become a novelty item. 

As an archaeologist, artist and post apocalyptic fiction fan I think I'm over due to answer that question. I'll post an update once my slab of window glass and bone turns into a useable tool and maybe after it lives in my pocket for a while. 
  

....and damn it. Meh, I'll find another hunk of glass. 


Sunday, October 19, 2014

Another Globe in the mix!

There's this constant quest for "the" bike, the perfect bike for all applications that more than likely doesn't exist. The more probable solution is accepting the limits of our machines and becoming better riders. Working as a bike messenger in San Francisco provides an opportunity to test bikes and riders on some of the most challenging terrain in the world.

Even on our "insane" hills my Globe Roll 1 has been a favorite. I don't ride it fixed and I do have brakes but even geared high in track bike range, once I got used to it, riding single speed is efficient and fast. Granted, I had a lot more adapting to do than the bike did and on my tired days I grab one of my geared bikes but I've even been able to manage a couple of 100 mile trips with my one lonely gear.

I was predictably excited recently when I added an early model Globe Daily 1 to the mix. Visually different from the Globe Roll series it offers similar ride quality and geometry in a full fender dressed up package complete with front rack, mustache style bars and stem mounted bell. So far it has tackled courier shifts and the back roads of Santa Cruz county earning the moniker "Daily" as it has become a true workhorse and go to utility bike pedaling to and from school, on weekend trips and hops across the Golden Gate for Coast Guard duty. With ample eyelets and lugs on it's sturdy aluminum frame, the Daily stands ready for all manor of racks and accessories begging the question, how feasible is touring on a single speed bike? While 100 mile days would be a chore, the daily would certainly go anywhere a vintage three speed could go. Back in the "good ol days" that was just about everywhere.

There are a handful of things needing upgrading. The brakes work but aren't stellar, the pedals look OK but leave a lot of room for improvement and the rear fender needs regular attention to keep it from rattling loose but those things stack up as minor in the big picture. Overall it's a damn classy bike and like it's Roll counterparts, outperforms nearly every other bike I've encountered in it's style and price range.

Update: About a week and 100 miles after writing this one of the pedals came apart. I replaced the stock pedals with a set of Specialized platform pedals with power straps. They work well but don't quite look right and will be getting another upgrade soon. I have a set of All-City pedals that would look a lot better and maintain the Daily as the one bike in my stable with non-SPDs

Friday, October 17, 2014

Martial skills for EMS

Tonight as I sit here admittedly whining about the vaccinations I got today making my arms ache, I'm contemplating gentle submission techniques to present to EMT students tomorrow. Our lead instructor has police and SWAT experience with a lot of very "real world" stress testing. That noted, I'm coming up with a small number of value added items to augment the standards. I'll be digging deep on this one to come up with things both simple and effective that are less likely to cause harm.

It's been a while since I gave my Oni Kai Aikido blog any attention but this may provide material and an interesting direction for a few posts. While I maintain that Aikido is about the longest path to field applicable combat skills a person could choose, it is effective none the less. 

I miss my days of nearly living in dojos and being immersed in this stuff. Maybe a new evolution for Oni Kai is in order. I can certainly think of less noble applications for martial systems. 

Sunday, October 12, 2014

Ross road bike project

Here's a (terrible) photo of the next build. It's a mid 70's lugged steel Ross road bike. It has nice looking geometry and just enough patina to lend it some character without being overly beat up. There are a couple things that will need to be straightened out but I'm looking forward to another everyday rider. I'll be kitting it out with a much more recent road bike as the donor for most of the missing parts. Very little will be new but it should be a fun bike. Otherwise known as functional and won't make me cry if some thug makes off with it. Though, I am increasingly careful of using multiple locks and near paranoia regarding neighborhoods where I lock up my bikes even for "a minute". 

I'm unexpectedly excited about this one. Must be some random nostalgic memory getting dredged up. Consider this my "before" photo and wish me luck piecing it together! 

Sunday, September 14, 2014

SOF T tourniquet

I have a reasonable amount of experience with tourniquets and  a few weeks ago at Urban Shield I got to do some side by side comparison with a variety of them in classes and scenarios. One of the instructor favorites was the SOF T. It's one of three that seem to be among the most popular. I had mixed feelings about it. In spite of some initial difficulties and one very specific application issue, it seems to be a solid choice for regular carry and field use. 

There are a number of pros to this model, not the least of which is the solid construction and metal windlass. The ones I worked with held up well and worked even when wet, an obvious positive point. I was able to quickly crank down and stop femoral bleeds and the SOF T seemed very well suited for use on legs, possibly better than some other models. 

On the cons side, it was difficult to tighten with self application. The buckle wasn't prone to rapid deployment and it was tricky getting the windlass locked with one hand and it isn't the easiest to grip wet. That might not be a big deal as long as you are not attempting self rescue but for that reason alone, it's not my favorite. I had a hard time at first meeting the time limits for my tests when attempting to apply the SOF T to my upper arms. I did manage to deploy within desired times but had better times with other tourniquets. This could be unique to me but the same tendencies were observed with other students. It got much worse with fluids. 

Overall I would say you can trust it to work for sure and it's a good choice for patient transport because of the secure locking ring. Again, after a fair amount of practice I was able to use it quickly and effectively but I would prefer it not take much practice. At any rate, it's a solid piece of gear that will serve well should you need it. Effectively the differences are minor but did add up to low double digit percentile changes on speed of deployment. With exsanguination times as rapid as three minutes, thirty seconds can make difference. 

Either way, it's a solid choice and in this case arguing for or against probably isn't necessary. If you encounter a SOF T on a patient don't hesitate to use it and if you like them by all means add them to your load out. 

Monday, September 1, 2014

Urban Shield 2014


So wow, Urban Shield 2014. I learned so much it's hard to cover everything but trying is probably a good way to remember more of it so I'll set best intentions now to write at least a few posts talking about some of what I learned. A heck of a lot of ground was covered from exposure to gear and skills to being around countless mentors ranging from Air Force para-rescue, SWAT teams, firefighters and medical professionals with decades of experience to stress training that put everything to the test. It was great. 

Among the more trackable benchmarks was getting my LEFR TCC certification, learning needle decompression and substantially upgrading my skills with tourniquets and triage. All more than worthwhile. I'm quite predictably a better first responder for having participated. 
From the skilled medics and doctors to the equally skilled operators I was privileged to train with and learn from, I'm humbled, impressed and owe many debts of thanks. Urban Shield was one of the best training exercises I have ever attended. I'm already looking forward to next year. 
On the off chance someone averse to the event gets a look at this post it may be helpful to consider that Urban Shield is not about militarizing the police. It is about preparing for disasters, natural and man made. This is how first responders prepare for everything from hurricanes and earthquakes to school shootings and terrorist bombings. I understand popular objections but no joke, you want this event to happen. If you are concerned about what goes on there maybe volunteer and see for yourself instead of preventing your community first responders from training to take care of you. 

Sunday, August 31, 2014

My jump bag load out

After a lot of years of BLS, ALS and pre-hospital trauma training through sources as varied as Scouting and Red Cross to the DOD, I have completed my EMR training and testing both filling in some gaps and bringing many disparate skills together in one functional body of knowledge. It's been a very positive experience that I am currently expanding to pursue EMT and PHTLS/TCCC certifications as well. After being an incidental first responder even before completing my EMR, I decided it was time to build a more serious jump bag for my volunteer activities with groups like NERT and the US Coast Guard and a trauma kit to pack in my messenger bag when I'm working as a bike messenger in San Francisco.

It seems that this is a challenge for a lot of newly certified EMR/EMT students that don't have the cash to buy pre-assembled kit from Galls or some other supplier who sell well thought out and complete kits starting at around $100 with nicer and more complete kits being upwards of $200-$300. Again, these are really nice and well thought out to include most things a first responder might need. Some consideration should be given to the idea that a jump bag should only contain things the person using it will be trained to use, but anyone who takes actual EMS courses will know what the items in a commercially assembled kit are for and know how to use them. In my case I was less trying to include every imaginable thing and more concerned with having enough of the basics while making room for critical items. There is no perfect or even "standard" kit. Mine is currently evolving both as I add things and increase my training level.

What I am not currently carrying in either bag is oxygen and cervical collars. A collar is too big for my smaller kit and the mini oxygen bottle is just too expensive right now. However both would be welcome additions and I'll likely be including both in the larger bag at some point. There are a couple other, "nice to have" items like a pulse oxymeter and a stop watch I added but other than O2 and a collar I'm pretty set. I don't anticipate needing those things on my own anyway but you just never know.My smaller kit was something I put together with things I needed for class(had to carry them around anyway), a few things I bought and several items that were kindly given to me from friends in the medical industry. The larger bag is a similar set up that started out as a very basic Galls kit someone gave me that was then expanded a lot with other items as they were introduced to my scope of practice. There is nothing in either kit that I have not been trained to use. 

I'm finding there is a minimum set of things I feel comfortable with like , gloves/compression bandage/tape and then the more complete load out with what you might expect any EMT to need. Even a kit as simple as the IPOK(individual officers patrol kit) that contains about four items in its simplest incarnation, saves lives. It also fits in a cargo or jacket pocket. It should be something every high school student knows how to use.

Bottom line, even if you only carry a pair of nitrile gloves, you should be carrying something with you at all times. 


Monday, April 7, 2014

2nd Annual St Patrick's Day ride

 Officially the St Patrick's Day Massacre, this year was the second year for the charity ride that raises money to fund a primary school art program in San Francisco. I was pleased to be asked back for another year of pedaling and photos. There were some fantastic moments on the ride and the city delivered on it's foggy reputation. We had a great time and I got to work on my action photography skills between sprints up Hawk Hill to get in position. If only I spent every weekend photographing cycling events...


Monday, March 10, 2014

Emergency Medical Service

Not so long ago I decided to upgrade and certify my medical training. City College has an affordable and accredited program that feeds into the EMS community here in San Francisco and the Bay Area. A few months later I'm half way through EMR training, just earned my CPR AED for pro rescuers credentials. It certainly makes me more useful and makes for a reliable career option, one of those "not going away any time soon" jobs and a fantastic community to be a part of.


In addition to learning the expected things, I'm learning how many organizations are in need of qualified medical technicians, key word being "qualified". Everyone from NERT/CERT, search and rescue groups and schools to private corporations with facilities of any size and a staff or patrons to protect may, or at least should, be looking for certified first responders for their team. Even if the primary "job" has nothing to do with EMS, it's never a bad idea to have pre-hospital care professionals around.
There are endless lists of opportunities open to motivated individuals willing to go after them and all of them have an array of payoffs that go far beyond the obvious. Considering that at one time or another all of us will have an opportunity to save a life, possibly our own or that of a loved one, we should also all be trained to do so.

Monday, January 27, 2014

Marmot Super Mica jacket

Since becoming a Blackburn Ranger and a more serious "adventure rider", I discovered some holes in my gear. Some literal and some metaphorical. In the case of needing a lightweight storm shell it was both. I'd been riding around in a really nice shell jacket from Chrome Industries, I loved the thing. It wasn't super water resistant and certainly not waterproof or breathable but it was a good jacket until I got in a wreck and took it for a slide across the pavement. It never was adequate for really getting out there, more a good looking, cycling specific thing that wold get you the rest of the way to your destination if it started to rain.

I had been trying to lay hands on a bicycle specific jacket when  friend at Marmot offered help with anything I might need. Having seen the Super Mica in a couple stores but not having the budget for it I was stoked. At 9oz the jacket is as lightweight as could be hoped for in a waterproof breathable. It's also single layer so there isn't a lot of garment to fight with and while it's light, it stops wind to the degree that you often don't miss having a lined jacket. Often, being able to manage warmth with base layers instead of having a jacket that is too warm is a serious bonus. It's become my go to jacket for cycling, climbing and travel in general.

I've been wearing it quite a bit for a few months now and it's holding up well. There's a small amount of abrading at the cuff and on the hood but the reinforced areas on the shoulders are good and so far I haven't noticed any thinning or failure of the waterproof fabric itself. Seems to be holding up at least as well as my Air Force issue Gore-tex stuff at a fraction of the weight. Granted it was designed for very different environments and activities but it breathes far better than my Gore gear has. I have been asked by a couple of people who also have the Super Mica if mine was "de-lamming" and while they said they had issues with the lining separating, as noted, I have not. I am admittedly cautious with mine having experienced Gore product self destructing as well as habitually protecting my sailing gear, something equally hard to replace and miserable when it fails underway. It is rumored that Marmot is developing a new version of the Super Mica but I can't personally confirm it.

It's one of those pieces of gear that I'm thankful to have had help affording but recommend to anyone, even at full retail. It's worth the money and I'm not one to say that lightly.

Thursday, January 23, 2014

Lighting for carnivorous plants

A while back I wrote a post about a project I did at Instructables.com putting together a carnivorous plant terrarium. It was fun, it looked great and it was a much bigger learning experience than I could have imagined. I learned about the plants, terrariums, the soil for those same plants that is certainly on the tricky side as is the water. It mostly just needs to be as "clean" as possible, meaning both chemical and nutrient free. Dissolved mineral content in soil and water will readily kill otherwise healthy carnivorous plants. This is probably why they are a seasonal or temporary curiosity for most people. A few months in and the plants mysteriously die or for other seemingly unpredictable reasons they do fine and keep on going. Even educated growers often experience difficulty rearing these finicky bug eating wonders.

Someone over at Instructables commented recently asking about lighting. I don't think I really addressed that issue in my how to or the subsequent how to on soil for carnivorous plants. Mine lived in a big jar in a sunny window where they had bright light most of the day. A lot of us don't have access to those conditions, including me now that I am no longer with Instructables.

Luckily, carnivorous plants do well with artificial lighting so even basement dwellers can put together a lovely hungry garden. There is even a fantastically detailed article on the International Carnivorous Plant Society website that explains the lumens, color temperature and hours per day the plants need. There are many commonly available lighting setups or you could just buy LEDs and build your own. With the ease of controlling LEDs with Arduinos and Raspberry Pie microcomputers you could automate the whole thing from lighting to temp and hydrometers. Though, a lot of people have great luck stuffing the plants in a jar and setting them on a handy window sill.

As always, it's hard to beat "doing" as the best way to learn.