
Thursday, February 7, 2013
Of Archaeology and Marshalltown trowels

Fried smelt
 |
| Thawed smelt on ice |
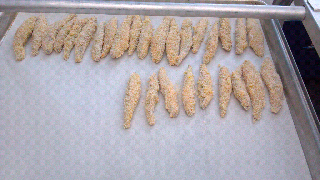
Not long ago I had a chance to go lend a hand with the Forage SF Underground Market. It's an event that was happening on a fairly regular basis, though this one would be the last. I Had shown up to tend bar and help that way but Chef Larry was kind enough to have me outside working the fried smelt pop up. Smelt are a fun little fresh water fish similar to sardines or herring. Often used as bait fish, they make for a great meal battered and deep fried whole. The humorous nickname, "fries with eyes" is often heard near a fryer full of smelt.
 |
| ready for the fryer |
 |
| I ate them too fast to get a better photo |
Smelt typically run once a year and fishermen simply go out and net them. You can haul a lot of the little things out of a lake in one go and freeze what you don't cook up on the spot. This batch was from a lake in Ontario and had been shipped in frozen. This might not be ideal for other dishes but as they are battered and fried, it doesn't rob them of much.
To make them we washed and gently dried them, dredged them in a mix of flour and paprika. Next they went into an egg wash before being dredged in panko. You could use something other than these lovely little Japanese bread crumbs but they really are excellent. They were paired with caper aioli, a nice alternative to tarter sauce.
These can also be prepared in a "deep" skillet, like a typical iron skillet, with whatever oil is handy. They'd be nice fried in duck fat!
Thursday, January 31, 2013
Le Tour
 |
| Right after I got it, tires flat and not yet ridable. |
 |
| I'm not often one for kitsch but this is a pretty awesome ad. |
One fun project has been the unearthing and repair, not so much restoration, of a 1974 Schwinn Le Tour road bike. I picked it up at a garage sale for next to nothing and put in a lot of elbow grease along with some bike grease and hours to end up with a great looking bike that is fun to ride and more suitable for longer rides than my Globe, more on that as well. My original plan was to use it for randonneuring but it's become more of a special occasion and weekend bike for me so my quest for a randonneur worthy bike continues.
 |
| After it's first(and my first since the accident) bridge crossing. |
It was pretty grubby when I got it after sitting in a garage in Russian Hill since 1976. The tires had practically melted over the years but other than that and some rust here and there it was/is about as stock and complete an example of this iconic ride as you'll ever see. I've replaced the seat and swapped out the wheels from another vintage bike but it's essentially as purchased back in the 70's. Thanks to this handy site for Schwinn fans I was able to pinpoint exactly what I had found.
So far it's made a few rides across the Golden Gate Bridge up to Muir woods and around Marin as well as making appearances in San Francisco from time to time. I had planned to really change out a lot of things and update the bike but the more I ride it the more I like it just the way it is and I may do a randonneur race on it yet. Definitely one of those bikes that just sort of grows on you.
Friday, January 25, 2013
Fingerless mittens
 I tried a couple different styles, including knitting on double pointed needles but settled on a simple method using straight needles where you knit them flat and then stitch them up. It's easy, knits up fast and makes for pretty good fingerless mittens.
You can use Number 8 or 9 needles. Cast on 28-30 stitches of worsted weight yarn and knit two or three inches of ribbing. I like the look of only using knit stitches but alternating knits and purls would work just as well. When you have six inches or so of the body knit another inch or two of ribbing and bind off.
To stitch them up, fit the glove to your hand, starting at the finger end works best for me. Use a tapestry needle or the big ones yo find in knit shops and do a simple whip stitch down to where you'd like the thumb to be. I weave the yarn through the knitting to get it around the thumb opening and then, again fitting it to your hand, start stitching again and go down to the wrist. Simple as that. You can vary the stitches, make them fair isle, whatever you'd like.
Mine are working well for the mild, but still often cold, weather we have here in the San Francisco area. As with most knit gloves and mittens they wear quickly on a bicycle. I'm planning to stitch leather palms on a pair soon and see how that helps with the bicycle wear and tear.
Thursday, January 24, 2013
Cracker Barrel Banjo

What it is mostly is affordable but it's not a good beginner banjo. I use mine to practice rolls and just play around when I'm by myself with no one to annoy. Even at that, I'm a hare's breath away from putting a metal or birch top on it due to it's inability to be properly adjusted. It's a toss up really, either I modify this thing a bit more or hang it on the wall and look at it while I build a gas can banjo or some other fun thing that is vaguely more playable. There are also lots of nice banjo's and banjo ukulele's out there for a couple hundred bucks. This is far from the only low end of the market option.
Bottom line though, it's a fun thing to have around and as long as it isn't your only banjo, you might as well grab one next time you are having hash brown casserole at Cracker Barrel. I did look on the website but there were very few instruments and no banjo but my parents say they are still selling them in the gift shop at the one near them in northern Indiana.
Wednesday, January 23, 2013
Simple Sauerkraut

 |
| Coarse chopped |
1 head of red cabbage
2-3 tablespoons salt (I use basic kosher salt)
water to fill your container
Non-rusting container large enough to hold a head of chopped cabbage
A clean smooth rock to hold the cabbage under the water line
You could use a glass or a saucer, anything handy. I boil any stones I use.
Just layer the salt and cabbage until you fill the container or run out of cabbage. Try to pack it down and gently tap the jar on the counter to get as much air out as possible when you add water. Top it off with water so it covers the cabbage. I use a stone, drinking glass or saucer to hold the cabbage under the surface of the water, again this is important to keep the cabbage away from air and in the brine. That's it. Now set it some place warm(ish) 45 to 65 degrees seems to work well for me. Any colder and it won't ferment, warmer and it tends to rot. Though, using more than typical salt I don't seem to have that issue too often. Give it between a week and a month tasting as it goes. When you like how it tastes remove the stone or whatever is holding down the cabbage turned sauerkraut and refrigerate or eat within a day or two. I have managed to keep it in the refrigerator for about a month but it usually gets eaten before it has a chance to go bad.
You can add dill, mustard seed, caraway, fennel or anything else you might want. I just like it simple. It's very adaptive and can be used in everything from soup and stew to the expected brats and hot dogs. I've even topped mashed root vegetables with it!
If you are interested in more fermentation projects you might check out the Wild Fermentation site. My recipe is saltier and a much smaller batch than the one offered on the site but there are lots of ways to go about this and lots of fun things to try fermenting.
Friday, January 18, 2013
Evolution Beanie
 |
| Success! |
 |
| "Then this guy was all, Not the face!" |
A single skein of worsted weight wool usually makes one hat. Cast on 96 stitches using 16" number 8 circular needles. Knit about 9" for the body, then 2" of ribbing before binding off. Then simply gather and stitch the top closed. Nothing to it. A great hat even first time knitters can make.
Subscribe to:
Posts (Atom)