Monday, June 29, 2015

Dog's head hammer


There is a style of hammer typically associated with metal smithing, more often blacksmithing and within that, working with blades of one kind or another. Regionally it's often associated with Scandinavia and Japan. Known variously as a dog's head, cutler's and sawmaker's hammers, they all exhibit a weight forward design, usually having only one striking face. As a historically trained blacksmith I have encountered and used them but had for the most part forgotten about them until recent conversations jarred my fractured memory. 

In the forges of my youth we used mainly straight or ball peens as well as larger sledges. When I lived in Japan I saw some used in the shops I visited but again the majority of hammers were straight, ball and sledge. A recent visit to James Austin's forge in Oakland got my head wrapping back around iron, coupled with a move to East Bay it was kind of a mental homecoming. 

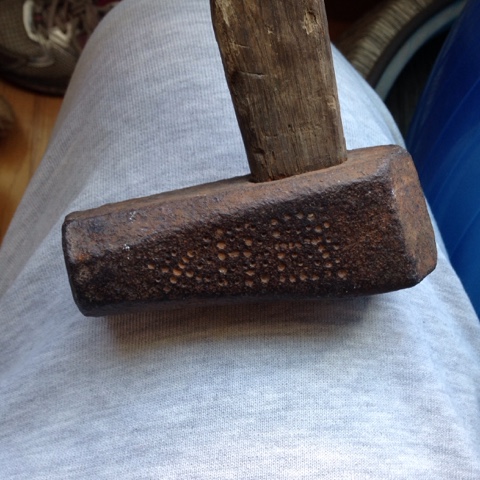
To that, I've been dusting off some tools and memories and thought I might post about an old dog's head I layed hands on. It came from Michigan, north of where I grew up, and was found in a log house built in the 1880s. By style, location and time of construction of house its associated with my educated guess is the hammer pre-dates the house. It's very clearly hand made and hafted with a hand shaved handle with wedges we would expect from a smithy. Based on Scandinavian settlement patterns in Michigan and the time period we know the hammer was there, it makes sense to have found it.
It could use some help, cleaning up anyway but in spite of looking rough can be used as is. There are no clear brand markings but there are what appear to be letters, "XhB" or maybe "XRB" on one side of the head. 

This type of hammer could very likely have been used to make and maintain crosscut saws of the type introduced into the Michigan logging industry in the 1870's and later and I'd say that's the likely history of this one, especially considering it was found in a log house. 

It's future will be as part of my forge tooling. Someone put a lot of time and effort into making it and clearly valued it enough to mark it so it would find its way back to them if lost. The least I can do is put it back to work. 

Saturday, June 27, 2015

Bianchi Sport SS reinvented

The Bianchi Sport I worked over a few years back(similar to the Eco Pista pictured above) turned out to be a great bike. It saw a lot of Nor Cal and even made it into a Blackburn video. While not one of the legendary Bianchi marks, it really is a great riding bike and it is my Bianchi regardless. Alas it suffered a setback when I took an off road shortcut and trashed the wheels beyond repair during the filming of that same Blackburn video. 

The replacement wheels got it back on the road but even with the help of pro mechanics, I never got it dialed in and working well again. I was lucky enough to have a loner bike through Blackburn and then get a couple of other nice late model bikes leading me to mothball the Bianchi. 

As noted, this Bianchi Sport wasn't a high end machine even new but it does have some nice frame tubing that's supposed to be better than the fancy all Italian manufactured bikes of the same era. So, it's both a good candidate for a radical upgrade and far from "ruining" a rare vintage bike. In part this is about realizing ideas I've had for it from the start. It's also an experiment to see how far I can take an old ten speed short of cutting and welding the frame. Turns out you can do a lot and it doesn't have to cost a fortune. 

Since these photos were taken its been through a couple evolutions including an upgrade to a modern stem. That will require an upgrade to different shifters and I finally found a celeste saddle for it. 

Specialized Sequoia

This one is more of a case study for discussion rather than a project post. I needed a more suitable commuter than my CAAD8 or Daily. This Specialized Sequoia is about one frame size smaller than I usually ride, and stock, it wasn't something I wanted to ride but it had promise. That's the point of this case study. It needed a lot of part swapping and some repairs but turned out well.

The first image is my complete(almost) Sequoia, the second is of a stock bike from the Specialized website. As sold, the Sequoia had a clunky adjustable stem, a heavy shock absorber seatpost and a funky comfort saddle. It also had an OK gruppo and a light, rigid frame with a nice carbon fork. In short, it didn't look like much at first but, by not ignoring what it could be, I was able to build a nice bike. It's also not too far off from the Sequoia Pro that sold for about double the price of the Sport model. Even got the bar tape looking decent this time! 

...of course now that it's built the way I want, works well and looks decent, much like my CAAD8, I'm left questioning whether to risk it locked in a rack.
 With the addition of a Tioga style saddle I think it's ready to roll for now. ...at least until I remember where I put those Dura Ace brakes.


Tuesday, May 26, 2015

2006 CAAD8


The latest adoptee in my stable of Frankenbikes is a truly fantastic project. In its current incarnation probably one of the nicest bikes bikes I've ever owned. Built for racing, it's not a great city bike and it's too light for touring but it's a dream to ride. 
The 2006 CAAD8 frame is stiff and responsive with aggressive race geometry and enough damping from the Ritchey carbon fork to keep the ride responsive but not jarring. The gruppo is a bit of a taboo myth buster with a Campagnolo Chorus drive train utilizing a Shimano ten speed cassette on Dura Ace 1380 wheels. "They" will say it can't be done but I assure you with the ten speeds it can. The Belgian compact crank up front is also amenable to eleven speed mixing with Shimano but I'm sticking with my ten. For the record I tried a Shimano wheel with a Dura Ace Cassette in an otherwise Campy Chorus drive train and it works as well as the American Classic wheel with Campy Cassette I have, better in terms of the ride.

It mostly took some fussy adjusting and measuring to figure out if it could be done and then a lot of head scratching and wrenching in Italian. I visited all of my usual bike guys and a few more to get help yanking the very stuck Campy Record seatpost out and learn a few critical details about drive trains. For the most part it needed cable adjustments that it would have needed regardless of the cassette. The bike had been sitting a long time and I suspect was formerly fitted with ZIPP wheels and a Campy cassette. It was dusty, dried out and neglected but came right back with a small amount of TLC. The end result is well worth the effort. 


Monday, March 16, 2015

Street sweeper bristles (pt2)

All the files you need
So once you have some raw materials and some files, you can make a few basic tools. An initial set doesn't need to be at all complicated. Just a hook and a tension wrench are all you need to get started. That noted, I have had great success with saw tooth rakes and they're not terribly hard to make. You can also start with a hook and leave the other end of your tool ready to shape once you figure out what you want to do with it. I make most of my tools double ended.

Double ended tools ready for final shaping
A basic pair of one tension wrench that has a hook on the end opposite the wrench and a double ended tool with a hook on one end and a rake on the other makes a good basic set. The hook on the wrench can be used as a feeler to test locks for condition and to count the number of pins. The rake allows for rapid picking that can then be finished with the hook on it's other end as is often the case. Set most of the pins with quick raking and SPP(single pin pick) the last one or two. This also leaves SPP as a first option. This should open most Master, Ace and random Chinese locks with reasonable practice. With more practice and time, most any lock can be SPP'd. This set is not as easy for the untrained to use as the popular Bogota rakes but has far more potential in the long run and allows a student to better understand what they are doing.

The basic process is to cut half circles out of the bristles at the ends and then shape them into hooks as shown side by side in the third image. This should be easy enough to logic out. Use the round files for making round cuts and flat files to shape the hooks
Basic hook
or rakes as shown in the fourth image. You could be very precise making these but you'll be close even if you aren't and the locks aren't that precise anyway. Just make sure to stack your peaks and valleys so that the peaks are points when you make a saw tooth and then round the end so it moves easily inside the lock.

Noteworthy points might be that my best hooks are almost all cut at about forty five degrees if you draw a line from the base of the arch to the end of the hook. You will almost certainly want to cut the inside of the arch before shaping the outside and then remove a lot of material from the shaft leading up to your tool end. The bristles are stiff and you want as little in your way inside the keyway as possible. Polishing is optional but if your raw material is particularly rusted or corroded but it doesn't take much and the tools do clean up a bit with use.
Different stages of completion of a saw tooth rake

There are innumerable YouTube videos showing basic attack methods. Fewer deal with tool fabrication. My thought is that tool manufacture is at least as important as the skills one needs for using them. Given the ease of acquisition of bristles and the quality of the metal I focus on making my tools as shown.

Other materials commonly available are windshield wiper blade springs, good but too soft for my liking. That means easy to shape but they wear out much faster and bend easier when you don't wan them to. So, I have and do use these springs but they aren't my preferred stock. A similar common material with potential is bra under wire strips. There are certainly plenty of bras but not so many sitting around waiting to be robbed of the wires. These are also somewhat softer metal and not to my liking.

I'll leave it at that. A couple very basic tools you can get about anywhere and street sweeper bristles you can also get about anywhere and keep a few on hand for later or just find when you need one.

So go out and make a hook and I'll get to work on the next installment, how to make a tension wrench.

Monday, February 2, 2015

Street sweeper bristles (pt1)

What? Right, it does say street sweeper bristles. What they are you might guess, why they are useful you would have to know. So, here is a post to get you in the know for what may be the most popular secondary use of street sweeper bristles.

While I'm sure there are other uses the two main things broken street sweeper bristles get used for are lock picks and clay sculpting tools. The relatively thin, durable, spring steel bristles are just shy of purpose made for both, especially lock picks. While they sharpen into ok little blades, make nice fish spears and random other things, my main use is lock sport tools. 

They seem to snap off where street sweepers, the big mechanized ones, turn corners or encounter rough pavement. Find them most often at cross walks. While even experienced lock sport folks won't usually need more than half a dozen tools at a time, they do break, get lost or more often are given away, perhaps even discarded for various reasons. Keeping a few bristles on hand is useful and leaving them as found advantageous. My personal preference for styles of lock sport tools has certainly changed over time. Between making my own new tools and sharing materials or making tools for others I often keep an eye to the curb for stray bristles. 

One major advantage of doing this and why it warrants a post introducing the topic is related to something I learned when I acquired some of my skills. 

The tools you start with will likely be your go to tools as your skills progress. Those who start with commercial tools usually prefer commercial tools and those who make their own tend to continue that practice. The utility in knowing how to make your own tools with materials that are literally laying around should be obvious. 

Next up, fast tracking some basics.